Help:CentralNotice
| This page has information about how to create and configure CentralNotice campaigns and banners. Before using CentralNotice, you should be very familiar with the content on this page. Changes to Special:CentralNotice affect all Wikimedia wikis, and should be done with extreme care and only if you know what you're doing. |
CentralNotice is the Mediawiki extension that delivers announcements (usually in the form of banners) to WMF wikis. It is used heavily by the Fundraising team to solicit donations, and for announcements of interest to Wikimedia communities and users. CentralNotice can target announcements by country, language, project, device and logged-in status.
For developer information, or to learn how to install CentralNotice on your own wiki, please see Extension:CentralNotice on Mediawiki. For information about the CentralNotice setup on the WMF's cluster, see CentralNotice on Wikitech.
Announcements displayed via CentralNotice are widely translated and typically relate to matters that concern the community at large, such as the 2009 shift to the CC-BY-SA 3.0 license, the annual Wikimania events, and the 2009 Strategy planning initiative. The system is also used to request donations and by content-focused campaigns like Wiki Loves Monuments.
CentralNotice admin is the interface used for the creation of CentralNotice banners and campaigns. How the CentralNotice admin works and how to use it are the primary concerns of this page. The CentralNotice admin is located at Special:CentralNotice and can only be used by central notice administrators.
| Parts of this document may be out-of-date or require substantial cleanup. (May, 2015) For information on campaign and banner setup following the September, 2015 CentralNotice update, please see this document. |
Campaigns
editIn order to display banners you must create a campaign. Campaigns allows fine grained control over what countries, languages and Wikimedia projects will see a set of banners in a given time period. Specifically a campaign has the following properties:
- Campaign name: The name of the campaign.
- Campaign type: It describes the kind of activities the campaign requires. Types are available to opt-out of in user preferences.
- Projects: The specific Wikimedia projects will see the banners.
- Languages: The targeted languages supported in the campaign. The selected language(s) version of that wiki will see the banners.
- For example if Projects is set to
wikipediaand language is set toesall readers to es.wikipedia.org will receive a banner. All editors whose interface language is set toeson any wikipedia.org project will receive a banner. - For example if Projects is set to
metaandwikipedia, and language is set toes, all readers to es.wikipedia.org will receive a banner. No readers of meta.wikimedia.org will receive a banner. All editors whose interface language is set toeson any wikipedia.org project and meta.wikimedia.org displaying their pages in Spanish will receive a banner.
- For example if Projects is set to
- Countries and regions: The geographic areas where the campaign is targeted.
- Start date/time: Specified in UTC, if the campaign is Enabled banners will start to be displayed at this time.
- End date/time: Specified in UTC, banners will stop being displayed at this time.
- Enabled: When checked the campaign will be used to display banners.
- Priority: Priority levels dictate what campaigns will be shown when multiple campaigns target the same project, language, country, and user state (logged in/out). A lower priority campaign will never be shown; but if two or more campaigns share the same level the banner weights will be combined and share the allocation. See below in 'banner weights' for more detail.
- The Top 10 Languages link will select the top ten languages that Wikimedia serves.
- Limit traffic: Limit traffic (only traffic, this is not related to user accounts, etc.) to proportion of total. For example you may set the limit to 30% so that only 30% of the total incoming traffic (siteviews) can see the banner.
- Locked: No properties may be changed on a locked campaign unless the lock is removed first.
- Archived: Archived campaigns cannot display banners, and, by default, they do not appear in the list of campaigns. Also (as in the case of locked campaigns) no properties may be changed on an archived campaign (unless it is unarchived first).
- Geotargeted: Optional Only users in selected countries will see the banners.
- To select banners the 'Geotargeted' checkbox must be selected.
- Geotargeting is inexact and may occasionally locate a user to an incorrect country, or may fail to locate at all. In cases where location is not possible at all the following special countries are provided for targeting:
| Country Code | Name | Description |
|---|---|---|
| XX | Unknown/Non-Geolocatable | Given when the data could not be processed or information simply does not exist. |
| A1 | Unknown/Anonymous Proxy | Given when the user is accessing Wikimedia sites through a known anonomizing service. |
| A2 | Unknown/Satellite Provider | Given when the user is accessing Wikimedia sites via a satellite connection. |
| O1 | Unknown/Other | Given in very rare cases when information exists, but not in sufficient quantity to determine a location. |
| EU | Unknown/European Union Region | Given in cases where a user could not be narrowed geographically down any further than the EU. |
| AP | Unknown/Asia Pacific Region | Given in cases where a user could not be narrowed geographically down any further than somewhere in the Asia Pacific region. |
- Bucketing: Optional See #Targeting with Buckets, below.
Manage campaigns
editOn Special:CentralNotice, one is immediately presented with a list of campaigns currently in use. The campaigns highlighted in green are currently active. Campaign priorities (see above) determine which campaigns are shown in situations where more than one campaign targets the same wiki. If you wish to get rid of a campaign, select "Archive". Once you are done making changes, click "Submit" at the bottom of the list.

Each item above links to a page containing details about a given campaign.
Editing a campaign
editAfter clicking on the name of specific campaign, you will be presented with a page containing all the settings for that campaign, such as start date and end date, which wikis it is targeted to, etc. When you are done editing a campaign, click "Submit" at the bottom of the page.
The campaign below is targeted only to all projects, in all languages, in France. It is enabled and has normal priority.

Creating a new campaign
editTo create a new campaign, scroll to the bottom of the Special:CentralNotice page and fill in the form in the "Add a campaign" section.
Banners
editEach campaign is assigned banners. Banners actually carry the message text, whereas the campaigns are topical categories for the banners. For example, during the 2008–2009 fundraiser, the "fundraiser_all_projects" campaign was assigned a variety of "please donate" and "personal appeal from Jimmy Wales" banners, each containing a unique message:


Right now, because the fundraiser has ended, fundraiser_all_projects is assigned only the post-fundraiser "thank you" note from Jimmy Wales:

If we click on a banner link, we are led on to another page from which we can edit the banner and insert translations of the message text. In 2008_jimmy_thank_you_b, we see the following directly below the Preview:
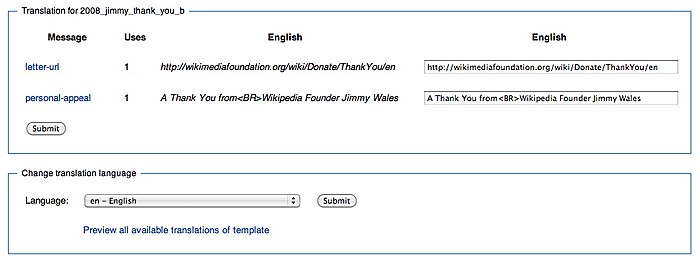

- [TODO: outdated image]


"letter-url" and "personal-appeal" link to the MediaWiki-space pages at which the message text is contained: MediaWiki:Centralnotice-2008 jimmy thank you b-letter-url and MediaWiki:Centralnotice-2008 jimmy thank you b-personal-appeal are respectively the English translations. Altering the text here will automatically edit the relevant MediaWiki pages. We are able to insert new translations for the message text by selecting a language in the drop-down box below "Change translation language". The MediaWiki page for a message mmm in a template ttt in a non-English language qqq is at MediaWiki:Centralnotice-ttt-mmm/qqq. For example, the MediaWiki page for the Russian (ru) translation of the "personal-appeal" component of "2008 jimmy thank you b" is at MediaWiki:Centralnotice-2008 jimmy thank you b-personal-appeal/ru.
Beneath the language options is the banner settings. This allows you define whether the banners are seen by anonymous users, logged in users or both. The This is a fundraising banner enables the banner to point to multiple pages which the banner will link to randomly of equal weights. When enabling this option it forces the banner to go through LandingCheck. LandingCheck makes using localized and geotargeted landing pages easy. It was created as a replacement for the GeoLite extension. [TODO: outdated instructions]
It requires a base landing page which, when the LP is called, the extension checks to see if a version of the landing page exists for the user's language and country. If not, it looks for a version localized for the user's language. If that doesn't exist either, it looks for the English version. If any of those exist, it then redirects the user. An exception to these rules is when the user comes from a country that handles its own fundraising:
- Germany (DE)
- Switzerland (CH)
In these instances, the language/COUNTRY system is switched to COUNTRY/language with the corresponding priorities switched as well. The banner enables tracking of banners/campaigns/landing pages through the use of utm url data. [TODO: check accuracy]
Further down, we see the raw code for 2008_jimmy_thank_you_b – its look, colour, size, and formatting, and where the message snippets ("letter-url" and "personal-appeal") are located. It is inadvisable to edit the text in this box without purpose and without having a good knowledge of CSS.

If we wish to assign more banners to "fundraiser_all_projects" campaign, we can return to the campaign's main page, tick "Add" for the banners we want under "Available banners", and click submit at the bottom of the page.
- Bottom of page


If we wish to create an entirely new banner, we go to the top of Special:CentralNotice, click "Banners", scroll to the bottom, and click "Add a banner":
- Banners selected: Special:CentralNotice
- Banners selected: Special:NoticeTemplate
- Bottom of Special:NoticeTemplate


From Special:NoticeTemplate, we are also able to view, click on, and remove all banners currently available.
[TODO: document mixins and device targeting]
Creating a banner
editIt is possible to build a banner from scratch or to use an existing banner or banner template. Please see Designing banners. In the example below we use the banner template templatev2. The template itself should not be edited but cloned. You can clone any existing banner but remember to check the compatibility including possible deprecation issues if JavaScript is used, especially if you decided to clone an old banner.
It is possible to build a banner from scratch or to use an existing banner or banner template. In the example below we use the banner template templatev2. The template itself should not be edited but cloned. You can clone any existing banner but remember to check the compatibility including possible deprecation issues if JavaScript is used, especially if you decided to clone an old banner.
- Example
Click on "Clone" to clone the banner:
![]()
Select a banner name:

Replace "My_New_Banner" with the name of your new banner and click on "Clone". The new banner has been created (copied from the template), now it is possible to modify the banners HTML.
In the "Settings" section you have to select the target (logged in or anonymous users or both) and the devices where the banner should be displayed (desktop, mobile, etc.). The used banner template is compatible with both desktop and mobile devices.
Note: Target only the needed languages and avoid showing banners in languages different from the users's if at all possible.
In the “Edit banner” you can edit the HTML and CSS of the banner. You can add text and files. When adding files make sure that the files are protected from re-uploads on the source wiki. Do not load files or code from outside Wikimedia. It is possible to create a localisable message, enclose a string in three curly brackets, e.g. {{{iwp-text-1}}}:

Click on “Save”, later you can set the content in the "Translatable banner messages" section. See Help:CentralNotice/Translations for details.
Please test your banner before you use it in production. You can preview the banner on the CentralNotice interface (See screenshot below) but you can test the banner as well directly in the wiki using the get parameters "&banner=BANNER_NAME&uselang=en&force=1".

You can assign the banner to a campaign in the "Available banners" section. You have to select the banner by hitting the checkbox and click on save. The banner is now assigned to a campaign:

Targeting user groups
editYou can target a banner to logged-in users, anonymous users, or both. To do so, select the checkbox for each group in the banner editing interface.
You can use mw.config.get( 'wgUserEditCount' ) to retrieve the edit count of the current user and mw.config.get( 'wgUserGroups' ) to get the user groups a user is in.
Targeting with Buckets
editBuckets are another way to divide users into groups and send different banners to each group. They can be useful in A/B testing. For example, if you configure a campaign to have two buckets, and set a different banner for each bucket, then users will only see one banner or another, based on a random bucket assignment made by CentralNotice's JavaScript and stored in a cookie.
If a campaign is unbucketed, all users can receive the banners regardless of their bucket assignment.
Note that this automatic assignment can only choose the first two buckets, A and B. Buckets C and D can only be assigned programmatically from ad-hoc JavaScript code. However, this is recommended only in special cases.
Banner history logger
editThe banner history logger is only used for Foundation fundraising purposes on a very low rate, since takes is a heavy load on the servers. No campaign outside of fundraising should need to use banner history: if you need specifics on traffic to the banner (for instance to account for a grant), you can put in a request in phabricator.
Limiting views
editIt is possible (and polite!) to limit the number of times a banner shows up for a particular user. This can be done using the "Impression diet" feature in the campaign settings, where you can set a maximum number of impressions someone will see (per device). You can also have it skip a certain number of impressions before showing a banner.
Designing banners
editCentral Notice banners are composed of five different pieces:
- CSS
- JavaScript
- HTML
- Images
- MediaWiki messages (for localization)
CSS
editWhen setting up any new banner it is vital that whatever CSS is used is isolated to just that banner. For instance B_1021_US1_Jimmy is an excellent example of good isolation. All of its css is prefaced with the specific identifier #B_1021_US1_Jimmy which corresponds to the id of the banner div.
Examples of bad banner css are selectors like a and div which would affect all text within the body of the page.
Since the z-index for the drop-down search suggestions is 1099, make sure that none of the elements in your banner have a z-index higher than that. Typically, banner elements are given z-indexes of 100 or less.
Use Wikimedia color palette as much as possible.
JavaScript
editSome banners feature a custom set of JS for added functionality. 2009_Notice30 is an example of one that has an added goToDonationPage function which allows the destinaton url to be further randomized without the need for multiple banners.
Close button
editSince the ability to dismiss a banner is core to the functionality of CentralNotice, the JavaScript code for it is located within the extension itself.
Since April 2014, it's also possible for a banner to dismissed on all wikis at once, so that users visiting multiple wikis don't have to dismiss it hundreds of times.
Making a call to hideBanner() will hide the centralNotice div and set a cookie to hide subsequent banners of the same type for two weeks. This function can be inserted automatically by clicking on the 'Insert close button' link in the banner editing interface. The cookie for hiding banners only hides banners that are in the same banner group as the one that hideBanner() was called from. Currently there are two banner groups: fundraising and default. To put a banner in the fundraising group, check the checkbox that says "This is a fundraising banner".
Note for old banners (in case you are re-using them): Use of "toggleNotice" is deprecated. Use mw.centralNotice method instead.
Use of document.write() discouraged
editBecause CentralNotice banners are often not written into the page until after the page has finished loading, document.write() or document.writeln() statements within banners will sometimes overwrite the entire page rather than just inserting content within the page. To avoid this problem, insert dynamic content using the DOM rather than document.write().
For example, instead of doing:
Hello <script type="text/javascript">document.write( mw.config.get( 'wgUserName' ) );</script>!
Welcome to <script type="text/javascript">document.write( mw.config.get( 'wgSiteName' ) );</script>.
Use DOM insertion instead:
Hello <span id="cn-username"></span>! Welcome to <span id="cn-sitename"></span>.
<script type="text/javascript">
$('#cn-username').prepend(mw.config.get( 'wgUserName' ));
$('#cn-sitename').prepend(mw.config.get( 'wgSiteName' ));
HTML
editWhen creating the actual structure of the banner, pay particular attention to keeping the design as simple as possible. Design them as if it was 1998 and use the lowest amount of complexity possible. banner templatev2 is a good example of very simple layout. All items are controlled through their own divs to allow for maximum customization while keeping the HTML simple.
Images
editWhen using images in CSS or raw <img> tags, do not use a full URL like http://upload.wikimedia.org/... -- your banners will be loaded over HTTPS for users on the secure interfaces, and this can cause a warning message to display in some browsers.
Instead use the protocol-relative URL form like //upload.wikimedia.org/... instead; this will let the browser select HTTP or HTTPS as appropriate.
  #mobileSurvey2011-logo {
    position: absolute;
    top: 20px;
    left: 25px;
    background-image: url(//upload.wikimedia.org/wikipedia/commons/thumb/1/12/Wikimedia_logo_text_RGB.svg/60px-Wikimedia_logo_text_RGB.svg.png);
    height: 60px;
    width: 60px;
    background-repeat: no-repeat;
  }
MediaWiki messages
editWe utilize triple bracket mediawiki messages in order to allow for translations. In order to add a new message you simply add:
{{{varname}}}
and after the form submission you will see the new message show up in the template translation window. To add a new language translations change the language option under Language to the desired setting and add the new translation.
Shared message namespace
editA convenient reuse available in the system is the ability to re-use messages from other banners. This allows us to not have to re-input the exact same message set that a collection of banners might use. An example would be:
{{int:Centralnotice-2009_Notice1-donate-text2}}
What this means is that we are pulling the donate-text2 variable from the 2009_Notice1 banner and re-using its content. This is very helpful when you have multiple banners all needing to point to one url. By keeping it set on one banner you only have to change it in one place.
Many commonly used messages are available from the shared banner.
Magic messages
editYou can use the magic message {{{campaign}}} to insert the name of the campaign, or the magic message {{{banner}}} to insert the name of the banner. Neither of these require translation.
Creating a new banner
editIf one is lucky then the banner you are trying to add already has a close approximate in the system. Copy the existing body into a new banner by following the link at the bottom of the Banners tab labeled 'Add a new banner' . Add the appropriate new messaging and load the inline preview to validate that all is well.
Note: Do not try to clone the banner via the "Create a copy of the banner" option, this is not what you want. That duplicates the banner entirely, including all of the translations.
Building a banner? Need a template to use? You may use templatev2. Klick on the >Clone< button and create your own banner using the template banner. Please do not edit this template directly.
Working with Translations
editQA testing
editCampaigns
editYou can simulate loading a wiki page from any country (to test campaign geotargeting) by adding ?country=<countrycode> to the end of the URL. (Use the 2-letter ISO 3166-1 code.)
Banners
editOnce a banner is configured in the CentralNotice system it is up to the editor to make sure it looks correct across all of our supported browsers. There are currently four steps to verify a banner:
- After saving your html/css/js, use the inline preview to verify that the content is as it should be.
- If the inline preview looks OK, then select the option labeled Preview all available translations of banner. If you have any translations other then English you should see them now. Pay close attention to spacing and text that is too long and either adjust the messaging or html/css to accommodate it as best as possible.
- Next, go to the Main Page of one of the wikis that you are going to run the banner on. Add
?banner=<bannername>(See mw:Extension:CentralNotice#Overriding selection for other get parameters which may be used for testing) to the end of the URL and reload. You should then be able to see the banner as it will appear when it goes live. Because there are local CSS quirks on every wiki, you may want to test the banner on all of the high-traffic wikis that you are going to run the banner on. It is also important to test on multiple browsers as we have a diverse set of users who use ie6+, firefox2+ and many others. - If all has gone well, you're likely ready to push it into production. Please clear the messaging that is used on the banner with the respective communities before enabling anything. Having gotten approval, add your banner to the correct campaign and load it on the wiki in question. You may need to do a hard refresh to see the new banner since the banner list is cached.
Do not rely on the NoticeTemplate view to be an accurate representation of the banner. The only way to see a completely accurate preview is use ?banner=<bannername>
Specific tips
editGeneral
edit- Link to a page to translate the banner, it's best to have that be a subpage of CentralNotice (see the others for examples).
- However, if this banner is being shown to all users, it's best to omit that link. (Vandalism frequently occurs in these cases, and we don't want bad words showing at the top of all of our wikis.)
- Links are necessary, but remember that we can't use wikitext, so be sure to use <a href= instead.
Elections
edit- Don't link directly to the voting page, link to some page explaining the vote first. Otherwise, people are more likely to be confused and just vote without knowing what they're voting for.
- If possible, try to restrict the campaign to only show to people it relates to.
Bug Reporting
editCentralNotice development is managed through the WMF Phabricator instance. The following link will add the appropriate projects to the Phabricator task. You only need to fill out the title and description and it will be routed appropriately.
Case of campaigns targeting newcomers on wikis using Growth team features
editThe Growth team has a list of some features on several wikis to help newcomers get started. If you're creating a campaign banner that:
- Targets one of the wikis where Growth features are deployed.
- Encourages people to create an account to join the event
Then you need an extra step to involve newcomers.
On these wikis, new users will automatically be redirected to their personal homepage. To help them find back the campaign, you have to create or edit MediaWiki:Growth-homepage-banner locally for the time of the campaign.
This message uses wikitext. Be careful though to keep it short, and with a small image if you use one. The message can be something like "You want to participate to [name of the campaign]. Click here!". Images used in the local message must have 52px as max size and be frameless.
See also
edit- CentralNotice – A translation landing page for current CentralNotices.
Links to other help pages
- Help contents
- Meta · Wikinews · Wikipedia · Wikiquote · Wiktionary · Commons: · Wikidata · MediaWiki · Wikibooks · Wikisource · MediaWiki: Manual · Google
- Versions of this help page (for other languages see further)
- What links here on Meta or from Meta · Wikipedia · MediaWiki
- Reading
- Go · Search · Namespace · Page naming · Section · Backlinks · Redirect · Category · Image page · Special pages · Printing
- Tracking changes
- Recent changes (enhanced) | Related changes · Watching pages · Diff · Page history · Edit summary · User contributions · Minor edit · Patrolled edit
- Logging in and preferences
- Logging in · Preferences
- Editing
- Starting a new page · Advanced editing · Editing FAQ · Export · Import · Shortcuts · Edit conflict · Page size
- Referencing
- Links · URL · · Footnotes
- Style and formatting
- Wikitext examples · CSS · Reference card · HTML in wikitext · Formula · Lists · Table · Sorting · Colors · Images and file uploads
- Fixing mistakes
- Show preview · Reverting edits
- Advanced functioning
- Expansion · Template · Advanced templates · Parser function · Magic words · System message · Substitution · Arrays · Expr parser function syntax · Transclusion
- Others
- Special characters · Renaming (moving) a page · Preparing a page for translation · Talk pages · Signatures · Sandbox · Legal issues for editors